
Have you ever meticulously applied concealer to a red blemish, only to find a dull, greyish patch staring back at you? Or tried to cover a dark spot, making it look even more obvious? You’re not alone. The challenge of creating an even skin tone is one of the most common frustrations in makeup. How to cover redness and dark spots effectively requires more than just heavy concealer; it requires a little bit of science. Welcome to the AAVIK, where we’ll teach you the professional secret to a truly flawless canvas: color correcting.
The Science of Color: How Color Correcting Works
Before we dive into the “how,” let’s understand the “why.” Color correcting seems complex, but it’s based on a simple principle from art class that every makeup artist knows.
Understanding the Color Wheel: A Simple Guide
Imagine a basic color wheel. Colors that are directly opposite each other on the wheel are called complementary colors. When layered, they effectively cancel each other out, resulting in a neutral tone. This is the foundational theory behind all color correcting.
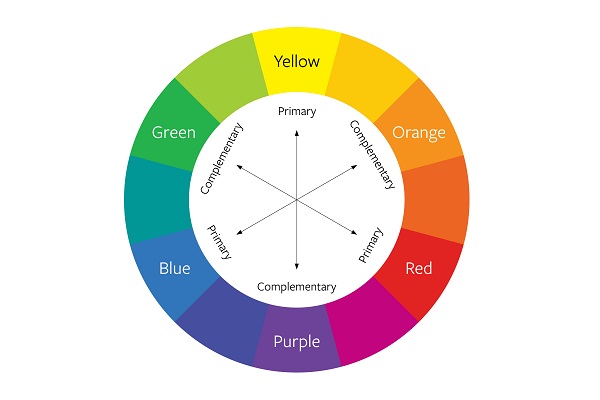
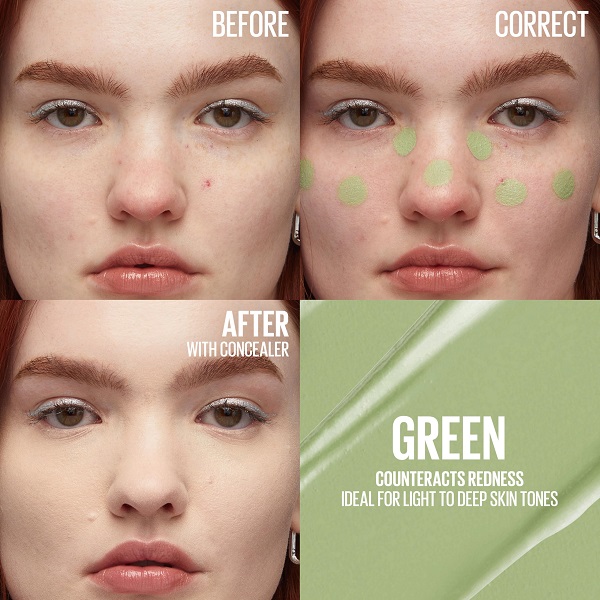
Why Green Cancels Out Red
Look at the color wheel, and you’ll find that green is directly opposite red. This means a green corrector is the perfect tool to neutralize any kind of redness, from an angry pimple to rosacea or broken capillaries. It eliminates the red tone so your foundation and concealer only have to match your skin tone, not fight against redness.
Why Peach/Orange Tones Neutralize Dark Spots
Similarly, tones of peach and orange sit opposite blue and purple on the color wheel. This makes a peach corrector ideal for neutralizing the bluish or purplish undertones found in under-eye circles and the brownish tones of dark spots and hyperpigmentation.
A Step-by-Step Guide to Conceal Red Spots on Your Face
Now, let’s put theory into practice. Here is your go-to guide for making redness disappear.
Step 1: Start with a Calming, Soothing Primer
Begin with a primer that soothes the skin. This creates a smooth base and can help to calm some of the initial inflammation, making your job easier.
Step 2: Apply a Green Color Corrector Sparingly
Using a small brush or your fingertip, apply a very thin layer of green color corrector only on the areas of redness. The key is to be precise. You want to neutralize the red, not turn your face green!
Step 3: Use a High-Coverage Concealer with a Tapping Motion
After the corrector, gently tap a high-coverage concealer (like the Aavikuk cushion) over the area. A tapping motion builds coverage without disturbing the corrector underneath.
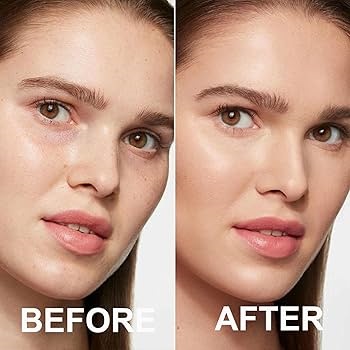
Step 4: Blend a Lightweight Foundation Over the Top
Finally, apply your foundation over your entire face to unify everything. The corrected areas should now blend seamlessly into the rest of your skin, leaving behind a perfectly even tone.
Tackling Dark Spots: The Best Makeup for Hyperpigmentation
The process for dark spots is similar, just with a different color. This is the best makeup for hyperpigmentation technique.
Step 1: Choose a Peach or Apricot-Toned Corrector
Select a peach corrector for lighter skin tones or an apricot/orange one for deeper skin tones. This will counteract the brown or purple undertones of the dark spots.
Step 2: Pinpoint Application on Discoloration
Just as with redness, apply a thin layer of the corrector precisely onto the areas of hyperpigmentation. Gently blend the edges.
Step 3: Layering Your Foundation for a Seamless Finish
Apply your foundation over the corrected spots and the rest of your face. You will see that the discoloration has been neutralized, leaving a smooth, even complexion.
The Aavikuk Advantage: One Product for Flawless Correction
While color correctors are fantastic tools, Aavikuk was designed to simplify your routine. Our Jewel Radiance Cushion offers a powerful, all-in-one solution for an uneven skin tone.
High-Coverage Pigments to Neutralize Imperfections
The Aavikuk concealer-like power within our cushion foundation is packed with high-coverage pigments. For many everyday blemishes and mild redness, the coverage is so effective that it can neutralize imperfections without a separate color-correcting step.
Gemstone Powders for Optical Blurring
Our formula contains 7 gemstone powders that create a soft-focus, optical blurring effect. This doesn’t just cover imperfections; it scatters light to make them visually disappear, enhancing the look of a flawless canvas.
A Skin-Caring Formula That Won’t Irritate
Most importantly, our thermal spring water formula soothes the skin as you wear it. This means you’re not just covering up redness and irritation; you’re actively calming it, making it the ideal makeup for hyperpigmentation and sensitive areas.
Your Canvas, Perfected with Confidence
Creating an even, flawless base is no longer a makeup mystery. By understanding the simple science of color and arming yourself with the right techniques and tools, you can become the master of your own complexion.
Ready to become your own color-correcting expert? Arm yourself with the ultimate tool for a flawless canvas. Discover the high-coverage power of the Aavikuk Jewel Radiance Cushion.
FAQ: Your Color Correcting Questions Answered
Should I apply color corrector before or after foundation? Always apply color corrector before your foundation and concealer. The corrector’s job is to neutralize the underlying discoloration. Your foundation and concealer then go on top to match the corrected area to your natural skin tone.
Do I need different products to cover acne and dark spots? Technically, yes, as they require different corrector colors (green for red acne, peach for dark spots). However, a high-quality, high-coverage product like the Aavikuk foundation can often cover both effectively without needing separate correctors, simplifying your routine.
How do I avoid my makeup looking green or orange? The golden rule is “less is more.” Use the thinnest possible layer of corrector—just enough to neutralize the color, not to paint it over. Always follow with foundation or concealer to blend everything together seamlessly.
Can I use Aavikuk’s cushion foundation as a concealer? Yes! The buildable, high-coverage formula makes it an excellent concealer. You can use the “pinpoint” technique with the edge of the puff or a small brush to target specific blemishes after applying your initial foundation layer. It’s the perfect Aavikuk concealer and foundation in one.